How to Test Sharpness of a Knife: Ultimate Guide for Precision
Testing the sharpness of a knife is simple and essential. A sharp knife makes cooking easier and safer.
Knowing how to test knife sharpness can prevent accidents in the kitchen. A dull knife requires more force, increasing the risk of slipping and cutting yourself. On the other hand, a sharp knife glides through food with ease, making your tasks quicker and more efficient.
In this blog post, we will explore various methods to check if your knife is as sharp as it should be. Whether you are a professional chef or a home cook, these simple tests will help you maintain your knives in top condition. Stay tuned to learn how to ensure your knife is always ready for action.
Introduction To Knife Sharpness
A sharp knife is essential for both safety and precision. Every cook knows the frustration of a dull knife. It can slip and cause accidents. It also makes cooking a chore. But how can you tell if your knife is sharp? Testing knife sharpness is easy with a few simple methods.
Importance Of A Sharp Knife
A sharp knife is safer than a dull one. It cuts through food easily. This means less force is needed. Less force means fewer slips and accidents.
Precision is another key benefit. A sharp knife allows for clean, even cuts. This is important for both cooking and presentation. A sharp knife also reduces food waste. It cuts cleanly without tearing or crushing.
Common Misconceptions
“A dull knife can’t cause injuries.” This is false. A dull knife requires more force. This increases the risk of slips and cuts.
“All knives stay sharp forever.” This is also false. All knives, no matter the quality, dull over time. Regular maintenance is needed to keep them sharp.
“Only professionals need sharp knives.” Everyone benefits from a sharp knife. Whether you cook daily or occasionally, a sharp knife makes the task easier and safer.
| Misconception | Reality |
|---|---|
| A dull knife can’t cause injuries. | A dull knife is more dangerous. |
| All knives stay sharp forever. | All knives need regular sharpening. |
| Only professionals need sharp knives. | Everyone benefits from a sharp knife. |
Understanding the importance of a sharp knife is the first step. Knowing the common misconceptions helps you avoid mistakes. Let’s explore how to test the sharpness of your knife.

Credit: knifeaid.com
Visual Inspection
Visual inspection is a fundamental step in testing the sharpness of a knife. It helps to quickly determine the condition of the blade. By closely observing the knife, you can identify any potential issues or areas that need sharpening.
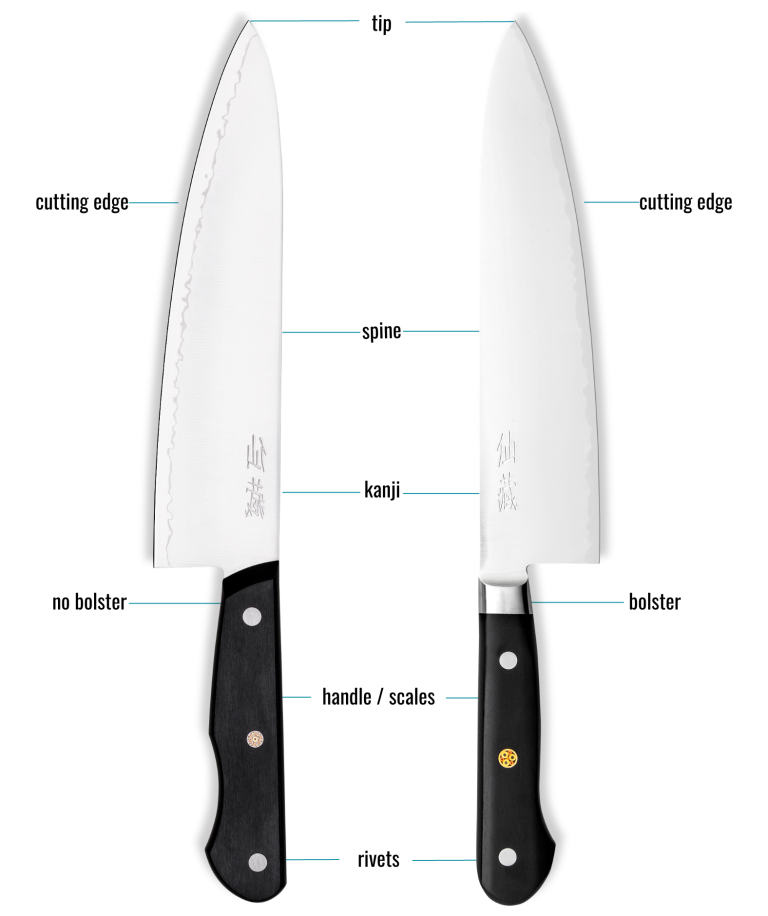
Edge Appearance
First, examine the edge of the knife. A sharp knife should have a smooth, even edge. Look for any nicks or dents. These imperfections indicate that the knife needs sharpening.
Check for a consistent bevel. The bevel is the sloped part of the blade. An uneven bevel can affect the knife’s performance. Make sure both sides of the bevel are symmetrical.
Reflections And Light
Next, use a light source to inspect the edge. Hold the knife under a bright light. A sharp edge will not reflect light. If you see light reflecting off the edge, it means the blade is dull.
Move the knife around and observe how the light interacts with the edge. This simple test can reveal dull spots that might not be visible otherwise. Remember, a sharp knife is crucial for both efficiency and safety in the kitchen.
Paper Test
Testing the sharpness of a knife is essential for safe and efficient cutting. One simple method to assess a knife’s sharpness is the Paper Test. This test is quick, requires minimal materials, and can be done at home. Let’s dive into how to perform the Paper Test effectively.
Choosing The Right Paper
To start, choose the right paper. Standard printer paper or newspaper works best. Avoid glossy or coated paper as they can give inaccurate results.
Here’s a quick table to help you choose the right paper:
| Type of Paper | Recommended |
|---|---|
| Printer Paper | Yes |
| Newspaper | Yes |
| Glossy Paper | No |
| Coated Paper | No |
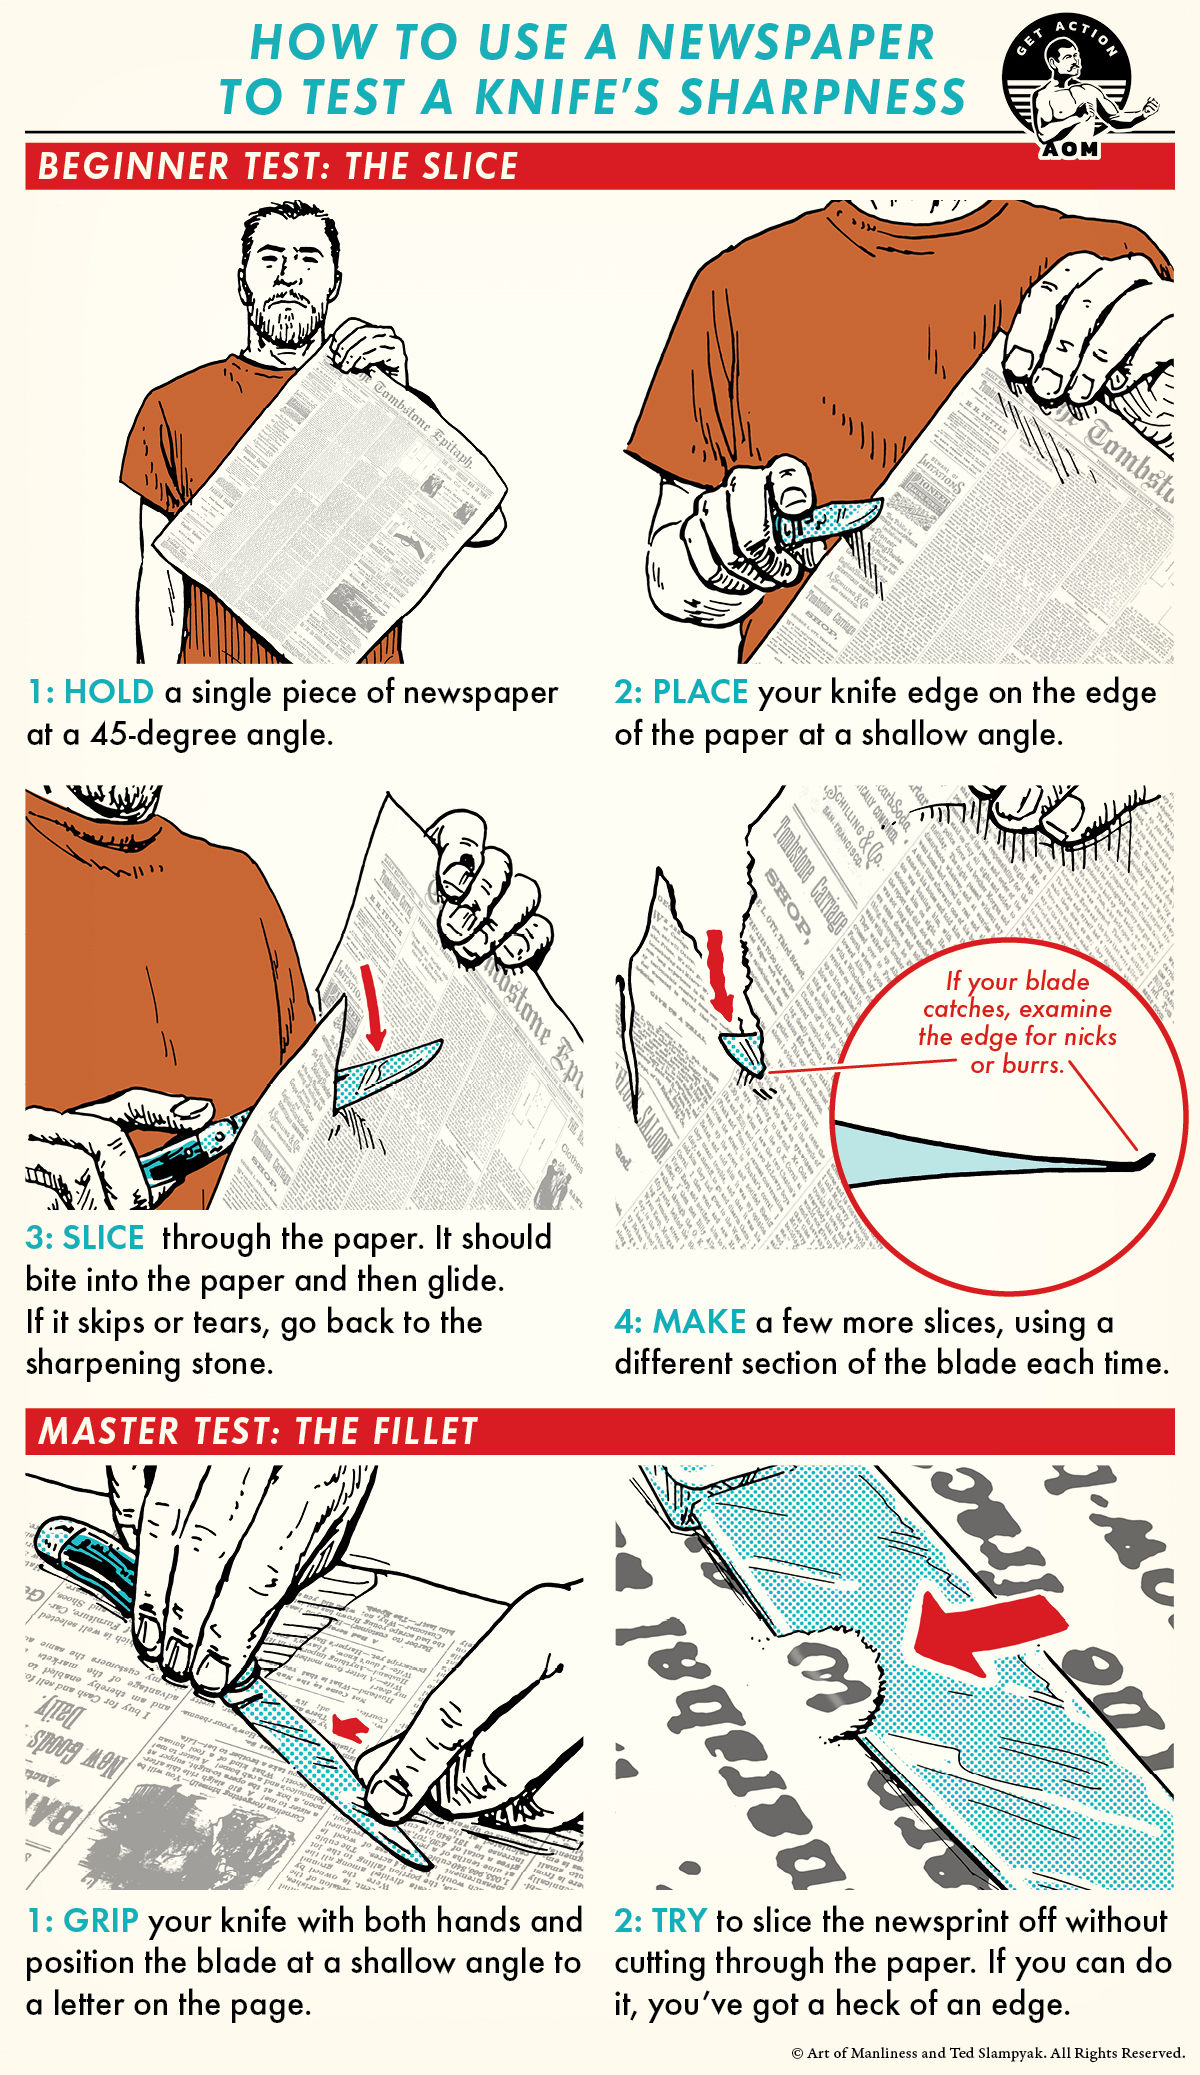
Proper Technique
Hold the paper with one hand and the knife with the other. The knife should be at a slight angle.
- Place the knife on the top edge of the paper.
- Gently slice down through the paper.
- Observe the cut. A sharp knife will slice cleanly.
Be careful not to use excessive force. The knife should cut through with minimal pressure. If the knife tears or struggles, it may need sharpening.
Here are some key points to remember:
- Sharp Knife: Cuts cleanly and smoothly.
- Dull Knife: Tears or struggles to cut.
- Minimal Pressure: Use light pressure for accurate results.
Performing the Paper Test regularly can help maintain your knife’s sharpness. It is an easy and effective method to ensure your knife is always ready for use.
Tomato Test
The Tomato Test is a popular way to check a knife’s sharpness. This method is simple and effective. You use a tomato to see how well your knife cuts. This test can show how sharp your knife really is.
Why Tomatoes?
Tomatoes have a thin skin and soft flesh. This makes them perfect for testing knife sharpness. A sharp knife should slice through a tomato easily. If the knife crushes the tomato, it needs sharpening.
Steps To Perform
First, place a tomato on a cutting board. Hold it steady with one hand.
Next, take your knife. Position the blade at the top of the tomato. Use a light touch. Do not apply pressure.
Then, pull the knife towards you. The blade should glide through the tomato. If the knife cuts smoothly, it is sharp. If it struggles or crushes the tomato, it is dull.
Repeat the test on different parts of the tomato. This ensures the entire blade is sharp. If you find any dull spots, sharpen the knife.
Hair Shaving Test
Testing the sharpness of a knife can be done using various methods. One popular method is the hair shaving test. This test is simple and gives instant feedback on the knife’s sharpness. Let’s dive into the details of this method.
Safety Precautions
Safety should always come first. Always handle the knife with care. Ensure the blade is clean and dry. Keep your hands steady to avoid accidents. Do not apply too much pressure during the test. This can lead to cuts. Perform the test in a well-lit area for better visibility.
Effective Method
To perform the hair shaving test, start by selecting a small area of your arm. Hold the knife at a shallow angle. Gently run the blade against your skin. Move in the direction of hair growth. If the knife is sharp, it will easily shave off the hair. The blade should glide smoothly without pulling. If the knife struggles, it may need sharpening. Remember to clean the blade after testing.
Arm Hair Test
Testing the sharpness of a knife is crucial for safe and efficient cutting. The Arm Hair Test is a quick and effective method. It helps determine if your knife is sharp enough for precise work.
Preparation
Before you begin, make sure your arm is clean and dry. This ensures accurate results and prevents any potential irritation. Hold the knife at a comfortable angle, typically around 30 degrees. Ensure good lighting to see the results clearly.
Interpreting Results
Gently glide the knife over a small patch of arm hair. If the knife easily shaves off the hair without pressure, it is very sharp. If it struggles or requires pressure, the knife may need honing or sharpening.
Here’s a quick reference table to help you interpret your results:
| Observation | Sharpness Level |
|---|---|
| Effortless shaving | Extremely Sharp |
| Requires slight pressure | Moderately Sharp |
| Struggles or pulls hair | Dull |
Use these guidelines to maintain your knife’s edge. A sharp knife ensures precise and safe cutting in the kitchen.
Biting Into Fingernail
Biting into Fingernail is a simple yet effective way to test the sharpness of a knife. It involves using the edge of the blade to bite into a fingernail to determine its sharpness.
Procedure
- Hold the knife firmly.
- Position the blade against the edge of your fingernail.
- Apply gentle pressure and observe the result.
What To Look For
- A sharp knife will bite into the nail easily without slipping.
- Dull knives will slide off the nail or not create a mark.
- Be cautious to avoid injury during this test.
Advanced Testing Methods
Testing the sharpness of a knife can be an art and a science. While basic methods work well for casual cooks, advanced techniques offer precise results. These methods use professional equipment and scientific approaches.
Professional Equipment
Professional equipment offers accurate knife sharpness testing. The BESS (Brubacher Edge Sharpness Scale) tester is popular. It measures the force needed to cut a standardized medium. Lower force means a sharper knife. Another tool is the CATRA (Cutlery & Allied Trades Research Association) device. It evaluates sharpness by cutting standardized paper or plastic. These tools provide objective, repeatable results.
Scientific Approaches
Scientific approaches offer deeper insights into knife sharpness. Microscopes can reveal edge quality. They show nicks, chips, and wear not visible to the naked eye. Electron microscopes offer even higher detail. Another method is edge retention testing. It measures how long a knife stays sharp under constant use. This involves cutting a specific material repeatedly and measuring performance drop.
Maintaining Sharpness
Maintaining the sharpness of your knife is essential for safe and effective use. A sharp knife cuts smoothly and reduces the risk of accidents. To keep your knife in top condition, focus on regular honing and proper storage.
Regular Honing
Honing keeps the edge of your knife aligned. It does not remove material like sharpening. Use a honing rod regularly. Hold the rod upright on a stable surface. Place the knife at a 15-degree angle against the rod. Draw the knife down the rod, applying light pressure. Repeat on the other side. Do this for a few strokes on each side. Regular honing keeps your knife sharp longer.
Proper Storage
Store your knife properly to maintain sharpness. Avoid tossing it in a drawer. This can dull the blade. Use a knife block or magnetic strip. These methods keep the blade safe. They also reduce contact with other objects. This prevents damage. Proper storage extends the life of your knife.

Credit: www.sharpeningsupplies.com

Credit: www.sharpeningsupplies.com
Frequently Asked Questions
How Do You Test Knife Sharpness?
To test knife sharpness, use a piece of paper. Hold the paper up and slice through it. A sharp knife will cut smoothly without tearing. Alternatively, you can try slicing a tomato or onion. A sharp knife will easily cut through the skin without much pressure.
What Is The Paper Test For Knives?
The paper test involves slicing through a piece of paper. Hold the paper vertically and attempt to cut it. A sharp knife will effortlessly slice through the paper without snagging or tearing. This simple test helps determine if your knife is sharp enough for precise tasks.
How Often Should You Test Knife Sharpness?
Test your knife’s sharpness regularly, especially if you use it daily. A good rule of thumb is to check it weekly. Frequent use dulls the blade faster, so regular testing ensures optimal performance and safety in the kitchen.
Can A Dull Knife Be Dangerous?
Yes, a dull knife can be dangerous. It requires more force to cut, increasing the risk of slipping and causing injury. A sharp knife allows for better control and precision, reducing the likelihood of accidents. Always keep your knives sharp for safe and efficient use.
Conclusion
Testing a knife’s sharpness ensures safe and efficient use. Try the paper test. Slice through a sheet of paper. A sharp blade cuts easily. If it struggles, it’s dull. The tomato test is another option. A sharp knife slices without squashing.
Regular testing keeps your knives in top shape. Remember, a sharp knife is safer and more effective. Keep your tools ready for any task. Happy cooking and stay safe!